MedicalDemo1
vtk-examples/Cxx/Medical/MedicalDemo1
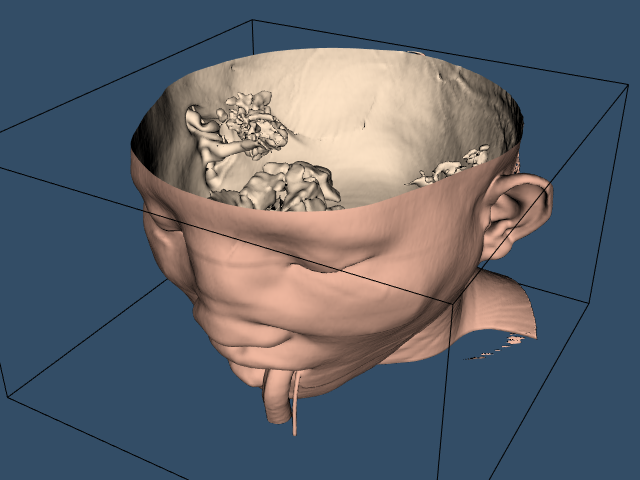
Description
The skin extracted from a CT dataset of the head.
usage
MedicalDemo1 FullHead.mhd
Note
The skin color was selected from Table 7 in Improvement of Haar Feature Based Face Detection in OpenCV Incorporating Human Skin Color Characteristic
Note
This original source code for this example is here.
Info
See Figure 12-2 in Chapter 12 the VTK Textbook.
Info
The example uses src/Testing/Data/FullHead.mhd which references src/Testing/Data/FullHead.raw.gz.
Question
If you have a question about this example, please use the VTK Discourse Forum
Code
MedicalDemo1.cxx
// Derived from VTK/Examples/Cxx/Medical1.cxx
// This example reads a volume dataset, extracts an isosurface that
// represents the skin and displays it.
//

#include <vtkActor.h>
#include <vtkCamera.h>
#include <vtkMetaImageReader.h>
#include <vtkNamedColors.h>
#include <vtkNew.h>
#include <vtkOutlineFilter.h>
#include <vtkPolyDataMapper.h>
#include <vtkProperty.h>
#include <vtkRenderWindow.h>
#include <vtkRenderWindowInteractor.h>
#include <vtkRenderer.h>
#include <vtkVersion.h>

// vtkFlyingEdges3D was introduced in VTK >= 8.2
#if VTK_MAJOR_VERSION >= 9 || (VTK_MAJOR_VERSION >= 8 && VTK_MINOR_VERSION >= 2)
#define USE_FLYING_EDGES
#else
#undef USE_FLYING_EDGES
#endif

#ifdef USE_FLYING_EDGES
#include <vtkFlyingEdges3D.h>
#else
#include <vtkMarchingCubes.h>
#endif

#include <array>

int main(int argc, char* argv[])
{
  if (argc < 2)
  {
    cout << "Usage: " << argv[0] << " file.mhd e.g. FullHead.mhd" << endl;
    return EXIT_FAILURE;
  }

  vtkNew<vtkNamedColors> colors;

  std::array<unsigned char, 4> skinColor{{240, 184, 160, 255}};
  colors->SetColor("SkinColor", skinColor.data());
  std::array<unsigned char, 4> backColor{{255, 229, 200, 255}};
  colors->SetColor("BackfaceColor", backColor.data());
  std::array<unsigned char, 4> bkg{{51, 77, 102, 255}};
  colors->SetColor("BkgColor", bkg.data());

  // Create the renderer, the render window, and the interactor. The renderer
  // draws into the render window, the interactor enables mouse- and
  // keyboard-based interaction with the data within the render window.
  //
  vtkNew<vtkRenderer> aRenderer;
  vtkNew<vtkRenderWindow> renWin;
  renWin->AddRenderer(aRenderer);

  vtkNew<vtkRenderWindowInteractor> iren;
  iren->SetRenderWindow(renWin);

  vtkNew<vtkMetaImageReader> reader;
  reader->SetFileName(argv[1]);

  // An isosurface, or contour value of 500 is known to correspond to the
  // skin of the patient.
#ifdef USE_FLYING_EDGES
  vtkNew<vtkFlyingEdges3D> skinExtractor;
#else
  vtkNew<vtkMarchingCubes> skinExtractor;
#endif

  skinExtractor->SetInputConnection(reader->GetOutputPort());
  skinExtractor->SetValue(0, 500);

  vtkNew<vtkPolyDataMapper> skinMapper;
  skinMapper->SetInputConnection(skinExtractor->GetOutputPort());
  skinMapper->ScalarVisibilityOff();

  vtkNew<vtkActor> skin;
  skin->SetMapper(skinMapper);
  skin->GetProperty()->SetDiffuseColor(
      colors->GetColor3d("SkinColor").GetData());

  vtkNew<vtkProperty> backProp;
  backProp->SetDiffuseColor(colors->GetColor3d("BackfaceColor").GetData());
  skin->SetBackfaceProperty(backProp);

  // An outline provides context around the data.
  //
  vtkNew<vtkOutlineFilter> outlineData;
  outlineData->SetInputConnection(reader->GetOutputPort());

  vtkNew<vtkPolyDataMapper> mapOutline;
  mapOutline->SetInputConnection(outlineData->GetOutputPort());

  vtkNew<vtkActor> outline;
  outline->SetMapper(mapOutline);
  outline->GetProperty()->SetColor(colors->GetColor3d("Black").GetData());

  // It is convenient to create an initial view of the data. The FocalPoint
  // and Position form a vector direction. Later on (ResetCamera() method)
  // this vector is used to position the camera to look at the data in
  // this direction.
  vtkNew<vtkCamera> aCamera;
  aCamera->SetViewUp(0, 0, -1);
  aCamera->SetPosition(0, -1, 0);
  aCamera->SetFocalPoint(0, 0, 0);
  aCamera->ComputeViewPlaneNormal();
  aCamera->Azimuth(30.0);
  aCamera->Elevation(30.0);

  // Actors are added to the renderer. An initial camera view is created.
  // The Dolly() method moves the camera towards the FocalPoint,
  // thereby enlarging the image.
  aRenderer->AddActor(outline);
  aRenderer->AddActor(skin);
  aRenderer->SetActiveCamera(aCamera);
  aRenderer->ResetCamera();
  aCamera->Dolly(1.5);

  // Set a background color for the renderer and set the size of the
  // render window (expressed in pixels).
  aRenderer->SetBackground(colors->GetColor3d("BkgColor").GetData());
  renWin->SetSize(640, 480);
  renWin->SetWindowName("MedicalDemo1");

  // Note that when camera movement occurs (as it does in the Dolly()
  // method), the clipping planes often need adjusting. Clipping planes
  // consist of two planes: near and far along the view direction. The
  // near plane clips out objects in front of the plane; the far plane
  // clips out objects behind the plane. This way only what is drawn
  // between the planes is actually rendered.
  aRenderer->ResetCameraClippingRange();

  // Initialize the event loop and then start it.
  renWin->Render();
  iren->Initialize();
  iren->Start();

  return EXIT_SUCCESS;
}
CMakeLists.txt
cmake_minimum_required(VERSION 3.12 FATAL_ERROR)

project(MedicalDemo1)

find_package(VTK COMPONENTS
  CommonColor
  CommonCore
  FiltersCore
  FiltersModeling
  IOImage
  InteractionStyle
  RenderingContextOpenGL2
  RenderingCore
  RenderingFreeType
  RenderingGL2PSOpenGL2
  RenderingOpenGL2
)

if (NOT VTK_FOUND)
  message(FATAL_ERROR "MedicalDemo1: Unable to find the VTK build folder.")
endif()

# Prevent a "command line is too long" failure in Windows.
set(CMAKE_NINJA_FORCE_RESPONSE_FILE "ON" CACHE BOOL "Force Ninja to use response files.")
add_executable(MedicalDemo1 MACOSX_BUNDLE MedicalDemo1.cxx )
  target_link_libraries(MedicalDemo1 PRIVATE ${VTK_LIBRARIES}
)
# vtk_module_autoinit is needed
vtk_module_autoinit(
  TARGETS MedicalDemo1
  MODULES ${VTK_LIBRARIES}
)
Download and Build MedicalDemo1
Click here to download MedicalDemo1 and its CMakeLists.txt file. Once the tarball MedicalDemo1.tar has been downloaded and extracted,
cd MedicalDemo1/build
If VTK is installed:
cmake ..
If VTK is not installed but compiled on your system, you will need to specify the path to your VTK build:
cmake -DVTK_DIR:PATH=/home/me/vtk_build ..
Build the project:
make
and run it:
./MedicalDemo1
WINDOWS USERS
Be sure to add the VTK bin directory to your path. This will resolve the VTK dll's at run time.