Tutorial Step6
vtk-examples/Cxx/Tutorial/Tutorial_Step6
Description
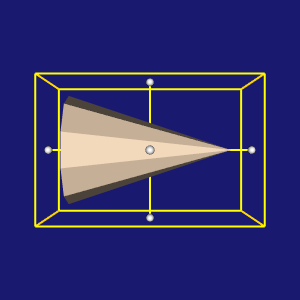
This example introduces 3D widgets. 3D widgets take advantage of the event/observer design pattern introduced previously. They typically have a particular representation in the scene which can be interactively selected and manipulated using the mouse and keyboard. As the widgets are manipulated, they in turn invoke events such as StartInteractionEvent, InteractionEvent, and EndInteractionEvent which can be used to manipulate the scene that the widget is embedded in. 3D widgets work in the context of the event loop which was set up in the previous example.
Other languages
See (Python)
Question
If you have a question about this example, please use the VTK Discourse Forum
Code
Tutorial_Step6.cxx
/*=========================================================================

  Copyright (c) Ken Martin, Will Schroeder, Bill Lorensen
  All rights reserved.
  See Copyright.txt or http://www.kitware.com/Copyright.htm for details.

     This software is distributed WITHOUT ANY WARRANTY; without even
     the implied warranty of MERCHANTABILITY or FITNESS FOR A PARTICULAR
     PURPOSE.  See the above copyright notice for more information.

=========================================================================*/

// First include the required header files for the VTK classes we are using.
#include <vtkActor.h>
#include <vtkBoxWidget.h>
#include <vtkCamera.h>
#include <vtkCommand.h>
#include <vtkConeSource.h>
#include <vtkInteractorStyleTrackballCamera.h>
#include <vtkNamedColors.h>
#include <vtkNew.h>
#include <vtkPolyDataMapper.h>
#include <vtkProperty.h>
#include <vtkRenderWindow.h>
#include <vtkRenderWindowInteractor.h>
#include <vtkRenderer.h>
#include <vtkTransform.h>

namespace {
//
// Similar to Tutorial_Step2.cxx, we define a callback for interaction.
//
class vtkMyCallback : public vtkCommand
{
public:
  static vtkMyCallback* New()
  {
    return new vtkMyCallback;
  }
  void Execute(vtkObject* caller, unsigned long, void*) override
  {
    vtkNew<vtkTransform> t;
    auto widget = reinterpret_cast<vtkBoxWidget*>(caller);
    widget->GetTransform(t);
    widget->GetProp3D()->SetUserTransform(t);
  }
};
} // namespace

int main(int, char*[])
{
  vtkNew<vtkNamedColors> colors;

  //
  // Next we create an instance of vtkConeSource and set some of its
  // properties. The instance of vtkConeSource "cone" is part of a
  // visualization pipeline (it is a source process object); it produces data
  // (output type is vtkPolyData) which other filters may process.
  //
  vtkNew<vtkConeSource> cone;
  cone->SetHeight(3.0);
  cone->SetRadius(1.0);
  cone->SetResolution(10);

  //
  // In this example we terminate the pipeline with a mapper process object.
  // (Intermediate filters such as vtkShrinkPolyData could be inserted in
  // between the source and the mapper.)  We create an instance of
  // vtkPolyDataMapper to map the polygonal data into graphics primitives. We
  // connect the output of the cone source to the input of this mapper.
  //
  vtkNew<vtkPolyDataMapper> coneMapper;
  coneMapper->SetInputConnection(cone->GetOutputPort());

  //
  // Create an actor to represent the cone. The actor orchestrates rendering
  // of the mapper's graphics primitives. An actor also refers to properties
  // via a vtkProperty instance, and includes an internal transformation
  // matrix. We set this actor's mapper to be coneMapper which we created
  // above.
  //
  vtkNew<vtkActor> coneActor;
  coneActor->SetMapper(coneMapper);
  coneActor->GetProperty()->SetColor(colors->GetColor3d("Bisque").GetData());

  //
  // Create the Renderer and assign actors to it. A renderer is like a
  // viewport. It is part or all of a window on the screen and it is
  // responsible for drawing the actors it has.  We also set the background
  // color here.
  //
  vtkNew<vtkRenderer> ren1;
  ren1->AddActor(coneActor);
  ren1->SetBackground(colors->GetColor3d("MidnightBlue").GetData());

  //
  // Finally we create the render window which will show up on the screen.
  // We put our renderer into the render window using AddRenderer. We also
  // set the size to be 300 pixels by 300.
  //
  vtkNew<vtkRenderWindow> renWin;
  renWin->AddRenderer(ren1);
  renWin->SetSize(300, 300);
  renWin->SetWindowName("Tutorial_Step6");

  //
  // The vtkRenderWindowInteractor class watches for events (e.g., keypress,
  // mouse) in the vtkRenderWindow. These events are translated into
  // event invocations that VTK understands (see VTK/Common/vtkCommand.h
  // for all events that VTK processes). Then observers of these VTK
  // events can process them as appropriate.
  vtkNew<vtkRenderWindowInteractor> iren;
  iren->SetRenderWindow(renWin);

  //
  // By default the vtkRenderWindowInteractor instantiates an instance
  // of vtkInteractorStyle. vtkInteractorStyle translates a set of events
  // it observes into operations on the camera, actors, and/or properties
  // in the vtkRenderWindow associated with the vtkRenderWinodwInteractor.
  // Here we specify a particular interactor style.
  vtkNew<vtkInteractorStyleTrackballCamera> style;
  iren->SetInteractorStyle(style);

  //
  // Here we use a vtkBoxWidget to transform the underlying coneActor (by
  // manipulating its transformation matrix). Many other types of widgets
  // are available for use, see the documentation for more details.
  //
  // The SetInteractor method is how 3D widgets are associated with the render
  // window interactor. Internally, SetInteractor sets up a bunch of callbacks
  // using the Command/Observer mechanism (AddObserver()). The place factor
  // controls the initial size of the widget with respect to the bounding box
  // of the input to the widget.
  vtkNew<vtkBoxWidget> boxWidget;
  boxWidget->SetInteractor(iren);
  boxWidget->SetPlaceFactor(1.25);
  boxWidget->GetOutlineProperty()->SetColor(
      colors->GetColor3d("Gold").GetData());

  //
  // Place the interactor initially. The input to a 3D widget is used to
  // initially position and scale the widget. The EndInteractionEvent is
  // observed which invokes the SelectPolygons callback.
  //
  boxWidget->SetProp3D(coneActor);
  boxWidget->PlaceWidget();
  vtkNew<vtkMyCallback> callback;
  boxWidget->AddObserver(vtkCommand::InteractionEvent, callback);

  //
  // Normally the user presses the "i" key to bring a 3D widget to life. Here
  // we will manually enable it so it appears with the cone.
  //
  boxWidget->On();

  //
  // Start the event loop.
  //
  iren->Initialize();
  iren->Start();

  return EXIT_SUCCESS;
}
CMakeLists.txt
cmake_minimum_required(VERSION 3.12 FATAL_ERROR)

project(Tutorial_Step6)

find_package(VTK COMPONENTS
  CommonColor
  CommonCore
  CommonTransforms
  FiltersSources
  InteractionStyle
  InteractionWidgets
  RenderingContextOpenGL2
  RenderingCore
  RenderingFreeType
  RenderingGL2PSOpenGL2
  RenderingOpenGL2
)

if (NOT VTK_FOUND)
  message(FATAL_ERROR "Tutorial_Step6: Unable to find the VTK build folder.")
endif()

# Prevent a "command line is too long" failure in Windows.
set(CMAKE_NINJA_FORCE_RESPONSE_FILE "ON" CACHE BOOL "Force Ninja to use response files.")
add_executable(Tutorial_Step6 MACOSX_BUNDLE Tutorial_Step6.cxx )
  target_link_libraries(Tutorial_Step6 PRIVATE ${VTK_LIBRARIES}
)
# vtk_module_autoinit is needed
vtk_module_autoinit(
  TARGETS Tutorial_Step6
  MODULES ${VTK_LIBRARIES}
)
Download and Build Tutorial_Step6
Click here to download Tutorial_Step6 and its CMakeLists.txt file. Once the tarball Tutorial_Step6.tar has been downloaded and extracted,
cd Tutorial_Step6/build
If VTK is installed:
cmake ..
If VTK is not installed but compiled on your system, you will need to specify the path to your VTK build:
cmake -DVTK_DIR:PATH=/home/me/vtk_build ..
Build the project:
make
and run it:
./Tutorial_Step6
WINDOWS USERS
Be sure to add the VTK bin directory to your path. This will resolve the VTK dll's at run time.
