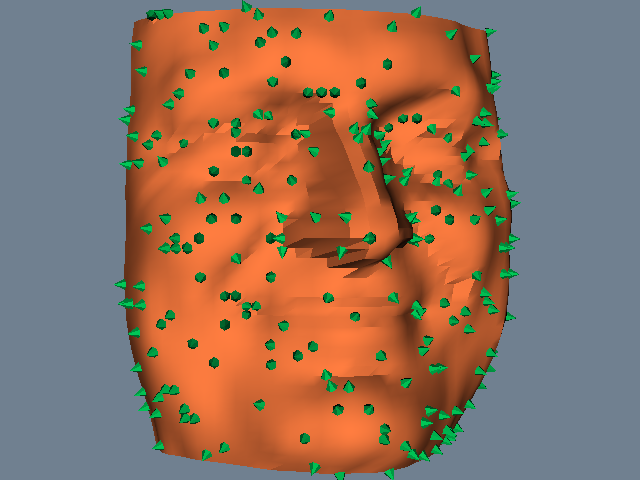
SpikeFran
vtk-examples/Python/VisualizationAlgorithms/SpikeFran
Question
If you have a question about this example, please use the VTK Discourse Forum
Code
SpikeFran.py
#!/usr/bin/env python

# noinspection PyUnresolvedReferences
import vtkmodules.vtkInteractionStyle
# noinspection PyUnresolvedReferences
import vtkmodules.vtkRenderingOpenGL2
from vtkmodules.vtkCommonColor import vtkNamedColors
from vtkmodules.vtkCommonTransforms import vtkTransform
from vtkmodules.vtkFiltersCore import (
    vtkGlyph3D,
    vtkMaskPoints,
    vtkPolyDataNormals
)
from vtkmodules.vtkFiltersGeneral import vtkTransformPolyDataFilter
from vtkmodules.vtkFiltersSources import vtkConeSource
from vtkmodules.vtkIOLegacy import vtkPolyDataReader
from vtkmodules.vtkRenderingCore import (
    vtkActor,
    vtkPolyDataMapper,
    vtkRenderWindow,
    vtkRenderWindowInteractor,
    vtkRenderer
)


def main():
    fileName = get_program_parameters()

    colors = vtkNamedColors()

    fran = vtkPolyDataReader()
    fran.SetFileName(fileName)

    normals = vtkPolyDataNormals()
    normals.SetInputConnection(fran.GetOutputPort())
    normals.FlipNormalsOn()

    franMapper = vtkPolyDataMapper()
    franMapper.SetInputConnection(normals.GetOutputPort())

    franActor = vtkActor()
    franActor.SetMapper(franMapper)
    franActor.GetProperty().SetColor(colors.GetColor3d('Flesh'))

    # We subsample the dataset because we want to glyph just a subset of
    # the points. Otherwise the display is cluttered and cannot be easily
    # read. The RandomModeOn and SetOnRatio combine to random select one out
    # of every 10 points in the dataset.
    #
    ptMask = vtkMaskPoints()
    ptMask.SetInputConnection(normals.GetOutputPort())
    ptMask.SetOnRatio(10)
    ptMask.RandomModeOn()

    # In this case we are using a cone as a glyph. We transform the cone so
    # its base is at 0,0,0. This is the point where glyph rotation occurs.
    cone = vtkConeSource()
    cone.SetResolution(6)

    transform = vtkTransform()
    transform.Translate(0.5, 0.0, 0.0)

    transformF = vtkTransformPolyDataFilter()
    transformF.SetInputConnection(cone.GetOutputPort())
    transformF.SetTransform(transform)

    # vtkGlyph3D takes two inputs: the input point set (SetInputConnection)
    # which can be any vtkDataSet and the glyph (SetSourceConnection) which
    # must be a vtkPolyData.  We are interested in orienting the glyphs by the
    # surface normals that we previously generated.
    glyph = vtkGlyph3D()
    glyph.SetInputConnection(ptMask.GetOutputPort())
    glyph.SetSourceConnection(transformF.GetOutputPort())
    glyph.SetVectorModeToUseNormal()
    glyph.SetScaleModeToScaleByVector()
    glyph.SetScaleFactor(0.004)

    spikeMapper = vtkPolyDataMapper()
    spikeMapper.SetInputConnection(glyph.GetOutputPort())

    spikeActor = vtkActor()
    spikeActor.SetMapper(spikeMapper)
    spikeActor.GetProperty().SetColor(colors.GetColor3d('Emerald_Green'))

    # Create the RenderWindow, Renderer and Interactor.
    #
    ren1 = vtkRenderer()
    renWin = vtkRenderWindow()
    renWin.AddRenderer(ren1)

    iren = vtkRenderWindowInteractor()
    iren.SetRenderWindow(renWin)

    # Add the actors to the renderer, set the background and size.
    #
    ren1.AddActor(franActor)
    ren1.AddActor(spikeActor)

    renWin.SetSize(640, 480)
    renWin.SetWindowName('SpikeFran')

    ren1.SetBackground(colors.GetColor3d('SlateGray'))

    # Render the image.
    #
    renWin.Render()

    ren1.GetActiveCamera().Zoom(1.4)
    ren1.GetActiveCamera().Azimuth(110)
    renWin.Render()
    iren.Start()


def get_program_parameters():
    import argparse
    description = 'This example demonstrates the use of glyphing.'
    epilogue = '''
    We also use a mask filter to select a subset of points to glyph.

    About the data file:
      This originally was a Cyberware laser digitizer scan
      of Fran J.'s face. Surface normals are generated based on local geometry
      (i.e., the polygon normals surrounding each point are averaged). We flip
      the normals because we want them to point out from Fran's face.
    '''
    parser = argparse.ArgumentParser(description=description, epilog=epilogue,
                                     formatter_class=argparse.RawDescriptionHelpFormatter)
    parser.add_argument('filename', help='fran_cut.vtk')
    args = parser.parse_args()
    return args.filename


if __name__ == '__main__':
    main()