How to set up VirtualGL and TurboVNC for use with ParaViewWeb
Introduction
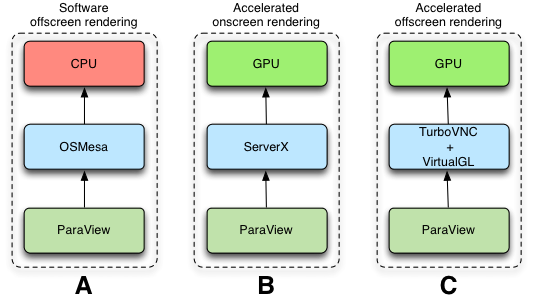
In order to run ParaViewWeb, a rendering environment is required on the machine on which it will be run. There are three ways to achieve a rendering environment, each of which is depicted in the image below. One way is to build ParaView with OSMesa support. Accordingly, ParaView will perform software rendering (on the CPU) instead of using the screen and any GPU driving it. This is depicted in the image below as approach A. Another approach is to require that the user who will run ParaViewWeb is logged in to the machine, and that this user is running a valid display. In this case, ParaView will use the user’s valid display environment (and the GPU) to perform its rendering. This approach is depicted in the figure below as approach B. The third approach, shown below as C, is to use a virtual display, such as that which is provided by a virtual network sharing (VNC) system. The third approach is the one we describe in this document. Here, we will illustrate how to use VirtualGL and TurboVNC in order to provide a virtual display environment for ParaViewWeb so that it can leverage the GPU.
Procedure Overview
At the highest level, the procedure for setting up ParaViewWeb to render using VirtualGL and TurboVNC is as follows:
- Install, configure, and test VirtualGL
- Install TurboVNC
- Use VirtualGL and TurboVNC to run ParaViewWeb
Install, Configure, and Test VirtualGL
Below is a summary of the instructions for installing, configuring, and testing Virtual GL on Ubuntu 12.04. The original, complete instructions are located here.
Download the package (a .deb file) from here:
http://sourceforge.net/projects/virtualgl/files/VirtualGL/2.3.3/
Install the package:
sudo dpkg -i virtualgl_2.3.3_i386.deb
Shut down the display manager:
(first hit Ctrl-Alt-F1)
sudo /etc/init.d/lightdm stop
Run the virtualGL server config script from command-line (or remote via ssh):
sudo /opt/VirtualGL/bin/vglserver_config
You will be asked three questions during this configuration. You can arrange things how you like, but for the most secure configuration, you will want to reply in the affirmative to each question.
"Restrict 3D X server access to vglusers group?"  Yes.
"Restrict framebuffer device access to vglusers group?"  Yes.
"Disable XTEST extension?"  Yes.
Add a user: “kitware”
sudo useradd kitware
Add “root” and “kitware” users to vglusers group:
sudo usermod -a -G vglusers kitware
sudo usermod -a -G vglusers root
Restart the display manager:
sudo /etc/init.d/lightdm start
Now, using ssh to log in from another machine, run the following commands to test the VirtualGL configuration:
xauth merge /etc/opt/VirtualGL/vgl_xauth_key
xdpyinfo -display :0
/opt/VirtualGL/bin/glxinfo -display :0 -c
The following two paragraphs and intervening code segment are taken directly from the documentation site linked above.
You should also examine the output of glxinfo to ensure that at least one of the visuals is 24-bit or 32-bit TrueColor and has Pbuffer support (the latter is indicated by a “P†in the last column.) Example:
    visual  x   bf lv rg d st  colorbuffer  ax dp st accumbuffer  ms  cav  drw
  id dep cl sp  sz l  ci b ro  r  g  b  a F bf th cl  r  g  b  a ns b eat  typ
------------------------------------------------------------------------------
0x151 24 tc  0  32  0 r  y  .  8  8  8  0 .  4 24  8 16 16 16 16  0 0 None PXW
If none of the visuals has Pbuffer support, it is most likely because there is no 3D acceleration, which probably means that the correct 3D drivers are not installed (or are misconfigured.) Lack of 3D acceleration is also typically indicated by the word “Mesa†in the client GLX vendor string and/or in the OpenGL vendor string, as well as by the words “Software Rasterizer†in the OpenGL renderer string.
Install TurboVNC
Here is a summary of how to install TurboVNC on Ubuntu 12.04. The complete, original instructions can be found here.
Download the package file from here:
http://sourceforge.net/projects/virtualgl/files/TurboVNC/1.2/
Install it:
sudo dpkg -i turbovnc_1.2_amd64.deb
Use VirtualGL and TurboVNC to run ParaViewWeb
If TurboVNC and VirtualGL have been installed and set up correctly, then you can use them to provide a rendering environment for ParaViewWeb. On the machine on which you intend to run ParaViewWeb and perform the actual rendering, you must first be logged in as the user whom you placed into the vlgusers group in steps (5) and (6) of the section on VirtualGL. Then, you need to take the following steps:
Start the vncserver application, which is probably installed in /opt.
/opt/TurboVNC/bin/vncserver -noauth
Make a note of the display number that vncserver has selected for its display, as it is needed in the following steps.
You could also skip the -noauth argument the first time you run vncserver as the user who is in the vglusers group. You will then be asked to set up a password that users will need in order to connect to the vnc session. This is a more secure approach because a user without the password will not be able to connect to the vnc session (e.g. with vncviewer) and see what is happening. By giving the -noauth argument, you forego this password and, thereafter, anyone can connect to the vnc session without any credentials. However, in the use case we are targeting in this document, we do not expect anyone to connect to the vnc session.
Using the display number you noted in the previous step, set the DISPLAY environment variable that ParaViewWeb will use during this session.
export DISPLAY=:<display-number>.0
Where display-number is replaced with the actual display number you noted in step (1).
Now use the VirtualGL program, vglrun, to start the ParaViewWeb application of interest.
/opt/VirtualGL/bin/vglrun <path-to-pvpython> <path-to-paraview-build>/lib/site-packages/paraview/web/pv_web_visualizer.py --content <path-to-content> --port <port> --data <paraview-data-dir>
Where all the elements in angle brackets, shown above, have been replaced with the correct values.
When the ParaViewWeb application is finished, you should kill the vncserver session to release its resources and free up the display number it was using, as follows:
/opt/TurboVNC/bin/vncserver -kill :<display-number>
Where display-number, above, has been replaced with the display number you noted in step (1).
An automated example
As an example, here is a bash shell script, which automates the steps given above in a single script file:
#!/bin/bash

# vglPvRun.sh: a small bash script which demonstrates how to start
# a TurboVNC session, capture the display number it used, then
# set the DISPLAY environment variable to that number and run
# a ParaViewWeb application.  When the web application finishes,
# the TurboVNC session is killed which releases resources and
# frees the display number.
#
# You should make this script executable (e.g. "chmod 755 vglPvRun.sh")
# and then run it as "./vglPvRun.sh".

usage(){
    echo "Usage: $0 portNumber paraViewBuildDir paraViewDataDir vncServerPath vglRunPath"
    echo "   portNumber: The port on which the ParaViewWeb app should listen"
    echo "   paraViewBuildDir: The path to the folder where ParaView build dir is located"
    echo "   paraViewDataDir: The path the to the ParaViewData directory"
    echo "   vncServerPath: The location of the 'vncserver' program"
    echo "   vglRunPath: The location of the 'vglrun' program"
    exit 1
}

# Check if we got all the command line arguments we need
if [[ $# -ne 5 ]]
then
    usage
fi

# Grab the command line arguments into variables
port=$1
paraViewBuildDir=$2
paraViewDataDir=$3
vncServerPath=$4
vglRunPath=$5

# The command that runs vncserver and gives as part of its output
# the display
vncSrvOutput=`$vncServerPath -noauth 2>&1 >/dev/null`

# A regular expression, which we'll use to find the display number
# in the vncserver command output
srvOutRegex='started on display\s+([^:]+):([[:digit:]]+)\s+'

# Find the display number that vncserver chose for this session
if [[ $vncSrvOutput =~ $srvOutRegex ]]
then
    echo 'Found the hostname = '${BASH_REMATCH[1]}
    echo 'Found the display number = '${BASH_REMATCH[2]}
    displayNumber=${BASH_REMATCH[2]}
else
    echo 'Did not recognize output'
fi

# Now set the display environment variable to the display number
# we just captured
export DISPLAY=:$displayNumber.0

# Now run the ParaViewWeb application
$vglRunPath $paraViewBuildDir/bin/pvpython $paraViewBuildDir/lib/site-packages/paraview/web/pv_web_visualizer.py --content $paraViewBuildDir/www --port $port --data $paraViewDataDir

# When it finishes, make sure to kill the associated vnc session and
# release the display number.
$vncServerPath -kill :$displayNumber
You can copy/paste this script and customize it to run other ParaViewWeb applications or add your own arguments, etc.