Running with Docker Compose
Start here once you have SSH access and sudo privileges for a server or VM.
Note
Docker server installation is only supported on Linux distributions
Container Images
A DIVE Web deployment consists of 2 main application images (default tag latest; override with TAG in .env):
- kitware/viame-web — Girder web server and bundled Vue client
- kitware/viame-worker — Celery workers for transcoding, pipelines, and training
Infrastructure services required by the stack:
- MongoDB — Girder database
- RabbitMQ — Celery message broker
- Redis — Girder notification fan-out (job status and UI updates over WebSockets)
Upgrading from Girder 3? See Upgrading to Girder 5.

Install dependencies
SSH into the target server and install these system dependencies.
Tip
You can skip this section if you used Ansible to configure your server, as it already installed all necessary dependencies.
- Install NVIDIA Driver (version specified in VIAME)
sudo ubuntu-drivers installusually works.
- Install
dockerversion 19.03+ guide - Install
docker-composeversion 1.28.0+ guide - Install nvidia-container-toolkit
Basic deployment
Clone this repository and configure options in .env .
1 2 3 4 5 6 7 8 9 10 11 12 13 14 15 16 17 18 19 | |
VIAME server will be running at http://localhost:8010. You should see a page that looks like this. The default username and password is admin:letmein.
Docker Compose profile behavior
There are two ways to run the stack:
- Default (GPU-enabled): runs the web services,
localworker, the standard worker, and GPU workers. - CPU profile (
--profile cpu): runsgirder_worker_defaultandlocalworkeronly.
Use these commands:
1 2 3 4 5 | |
When GPU workers are not connected (for example, in CPU-only mode), the UI and API automatically disable pipeline and training features.
localworker
Docker Compose includes a required localworker service (in docker-compose.yml, under the gpu and cpu profiles) that runs celery -A girder_worker.app worker -Q local. It uses the same image as the Girder web server and consumes the local queue for lightweight tasks such as batch postprocess and async assetstore import. You must run localworker in both development and production; without it, jobs routed to the local queue will not execute.
When developing with docker-compose.override.yml, the same service mounts your local server/ code. See also Upgrading to Girder 5.
Production deployment
If you have a server with a public-facing IP address and a domain name that points to it, you should be able to use our production deployment configuration. This is the way we deploy viame.kitware.com.
containrrr/watchtowerupdates the running containers on a schedule using automated image builds from docker hub (above).linuxserver/duplicatiis included to schedule nightly backups, but must be manually configured.
You should scale the girder web server up to an appropriate number. This stack will automatically load-balance across however many instances you bring up. Keep localworker running as well (one instance is enough; it is not scaled with --scale girder).
1 2 3 4 5 6 7 8 | |
Splitting services
It's possible to split your web server and task runner between multiple nodes. This may be useful if you want to run DIVE Web without a GPU or if you want to save money by keeping your GPU instance stopped when not in use. You could also increase parallel task capacity by running task runners on multiple nodes.
- Make two cloud VM instances, one with NVIDIA drivers and container toolkit, and one without. This is still a special case of scenario 1 from the Provisioning Guide
- Clone the dive repository on both VMs. The
.envfiles are not identical — the web VM keeps the internal Compose service names, while the worker VM points at the web VM's IP or hostname (referred to below asWEB_HOST).
Warning
GIRDER_SETTING_WORKER_API_URL is applied by the web server as the worker.api_url Girder system setting and is then stamped into every job that is dispatched to workers. It must be set on the web VM. Setting it only on the worker VM has no effect on the callback URL that workers actually use.
Web VM .env
The web VM runs RabbitMQ, Redis, and Mongo as Compose services, so it keeps the internal service names — with one exception: GIRDER_SETTING_WORKER_API_URL must be an address the remote worker can reach, not the internal girder:8080.
1 | |
Note
Port 8080 is Girder's in-container port and is not published on the host. Traefik publishes the API on host port 8010 (base docker-compose.yml) or on 80/443 when you also use docker-compose.prod.yml. Use the published port here — never 8080.
This only applies when workers run on a separate host. For a single-node (all-in-one) stack, leave GIRDER_SETTING_WORKER_API_URL unset — the default http://girder:8080/api/v1 is correct because the worker resolves girder and reaches port 8080 over the internal Compose network.
Worker VM .env
On the worker VM, uncomment and set these to point at WEB_HOST:
GIRDER_WORKER_BROKER— RabbitMQ URL on the web VM (e.g.amqp://guest:guest@WEB_HOST/default)GIRDER_SETTING_WORKER_API_URL— Girder API URL on the web VM (e.g.http://WEB_HOST:8010/api/v1; match the web VM's value)GIRDER_NOTIFICATION_REDIS_URL— Redis URL on the web VM (e.g.redis://WEB_HOST:6379); required so workers can publish job/UI status notifications
Required connectivity
The worker VM must be able to reach the web VM on these ports (port 8080 does not need to be open between VMs):
| Port | Service | Purpose |
|---|---|---|
8010 |
Girder API (via Traefik) | Worker fetches job data and uploads results |
5672 |
RabbitMQ | Celery message broker |
6379 |
Redis | Job/UI status notifications |
You can verify reachability from the worker VM with nc -zv WEB_HOST 8010 5672 6379.
1 2 3 4 5 | |
In this split setup, localworker on the web server handles the local queue, girder_worker_default handles standard queue jobs, and the GPU workers handle pipeline/training queues. If GPU workers are offline, only non-GPU worker functionality remains available and pipeline/training actions are disabled.
Verify the configuration
After the stack is up, confirm the web server is handing out the correct callback URL (not the internal girder:8080 default). From the web VM's Swagger page or via curl:
1 | |
This must return your http://WEB_HOST:8010/api/v1 value. If it still shows http://girder:8080/api/v1, the web VM's GIRDER_SETTING_WORKER_API_URL was not applied — jobs will appear to dispatch (and GET /worker/status will look healthy, since that only reflects broker connectivity) but will stall because remote workers cannot reach girder:8080.
Addon management
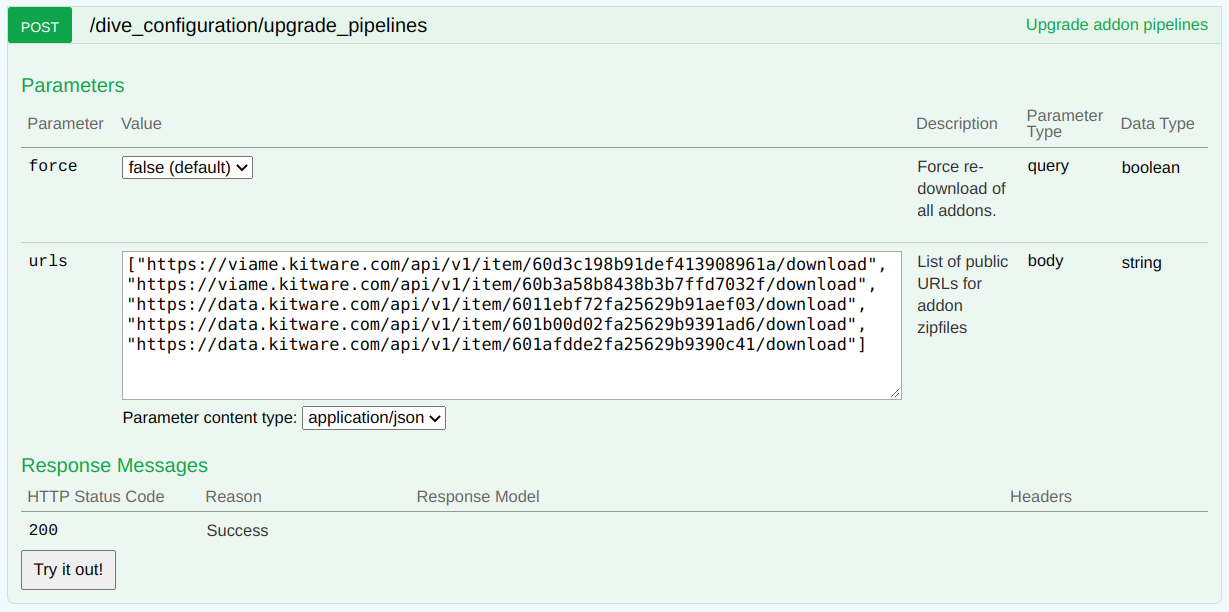
After initial deployment, DIVE Server will require an addon upgrade in order to download and scan for VIAME addons. This job runs on the pipelines worker so base pipelines are seeded from /opt/noaa/viame/configs/pipelines/ in the VIAME image. A GPU pipeline worker must be online. Run the upgrade by issuing a POST /dive_configuration/upgrade_pipelines request from the swagger UI at http://{server_url}:{server_port}/api/v1.
- Whether you
forceor not, only those pipelines from addons from the exact urls passed will be enabled on the server. - An old addon can be disabled by simply omitting its download from the upgrade payload.
forceshould be used to force re-download of all URLs in the payload even if their zipfiles have been cached.- An upgrade run is always required if the "common" pipelines in the base image change. These are updated for every run, and do not require
force. - See the job log to verify the exact actions taken by an upgrade job.
- Optional patches are updated occasionally and you can find the latest urls here.
Configuration Reference
Server branding config
You can configure the brand and messaging that appears in various places in the DIVE Web UI using the config API.
- Open the swagger page at /api/v1
PUT /dive_configuration/brand_datawhere the body is a JSON object from the template below. If you do not want to set a value and use the default, omit the key and value from the config body.
1 2 3 4 5 6 7 8 9 10 11 12 13 14 15 16 17 18 19 20 | |
Web Server config
This image contains both the backend and client.
| Variable | Default | Description |
|---|---|---|
| GIRDER_MONGO_URI | mongodb://mongo:27017/girder |
a mongodb connection string |
| GIRDER_ADMIN_USER | admin |
admin username |
| GIRDER_ADMIN_PASS | letmein |
admin password |
| GIRDER_WORKER_BROKER | amqp://guest:guest@rabbit/default |
RabbitMQ connection string (Celery broker) |
| GIRDER_WORKER_BACKEND | rpc://guest:guest@localhost/ |
Celery result backend (RPC) |
| GIRDER_SETTING_WORKER_API_URL | http://girder:8080/api/v1 |
Girder REST API URL used by workers. Default is correct for a single-node stack; override with the web host's published URL (e.g. http://WEB_HOST:8010/api/v1) only for split deployments. |
| GIRDER_NOTIFICATION_REDIS_URL | redis://redis:6379 |
Redis URL for notification fan-out |
| GIRDER_STATIC_ROOT_DIR | /opt/dive/clients/girder |
Built web client static files (set in image/Compose) |
There is additional configuration for the RabbitMQ Management plugin. It only matters if you intend to allow individual users to configure private job runners in standalone mode, and can otherwise be ignored.
| Variable | Default | Description |
|---|---|---|
| RABBITMQ_MANAGEMENT_USERNAME | guest |
Management API username |
| RABBITMQ_MANAGEMENT_PASSWORD | guest |
Management API password |
| RABBITMQ_MANAGEMENT_VHOST | default |
Virtual host should match GIRDER_WORKER_BROKER |
| RABBITMQ_MANAGEMENT_URL | http://rabbit:15672/ |
Management API Url |
You can also pass girder configuration and celery configuration.
Worker config
This image contains a celery worker to run VIAME pipelines and transcoding jobs.
Note: Either a broker url or DIVE credentials must be supplied.
| Variable | Default | Description |
|---|---|---|
| WORKER_WATCHING_QUEUES | null | one of celery, pipelines, training. Ignored in standalone mode. |
| WORKER_CONCURRENCY | # of CPU cores |
max concurrnet jobs. Lower this if you run training |
| WORKER_GPU_UUID | null | leave empty to use all GPUs. Specify UUID to use specific device |
| GIRDER_WORKER_BROKER | amqp://guest:guest@rabbit/default |
RabbitMQ connection string. Ignored in standalone mode. |
| GIRDER_SETTING_WORKER_API_URL | http://girder:8080/api/v1 |
Girder API URL (split/multi-node deployments). Ignored in standalone mode when using DIVE_API_URL. |
| GIRDER_NOTIFICATION_REDIS_URL | redis://redis:6379 |
Redis for notifications when running workers in Compose |
| KWIVER_DEFAULT_LOG_LEVEL | warn |
Log level for VIAME pipeline jobs (env name unchanged; used by the Kwiver logging stack) |
| DIVE_USERNAME | null | Username to start private queue processor. Providing this enables standalone mode. |
| DIVE_PASSWORD | null | Password for private queue processor. Providing this enables standalone mode. |
| DIVE_API_URL | https://viame.kitware.com/api/v1 |
Remote URL to authenticate against |
You can also pass regular celery configuration variables.
Running the GPU Job Runner in standalone mode
Linux Only.
Individual users can run a standalone worker to process private jobs from VIAME Web.
- Install VIAME from the github page to
/opt/noaa/viame. - Activate the install with
source setup_viame.sh. - Install VIAME pipeline addons by running
cd bin && download_viame_addons.shfrom the VIAME install directory. - Enable the private user queue for your jobs by visiting the jobs page
- Run a worker using the docker command below
Note: The
--volumemount maps to the host installation. You may need to change the source from/opt/noaa/viamedepending on your install location, but you should not change the destination from/tmp/addons/extracted.
1 2 3 4 5 6 7 8 9 | |