DIVE Desktop
DIVE is available as an electron based desktop application with VIAME integration. It has most of the same UI and features web. You may want to use desktop if...
- You want to make use of GPUs on your own workstation
- You need to use DIVE without network access
- You have large quantities of data on disk impractical for uploading to a server.
DIVE Desktop is fully supported on Windows and Linux. MacOS users can use it as an annotator, but without NVIDIA Driver support, the machine learning features from VIAME are unavailable.
Installation
Download the latest DIVE Desktop from GitHub
Choose an asset from the list matching your operating system:
| OS | Extension | Description |
|---|---|---|
| Windows | .exe | Portable executable (recommended) |
| Windows | .msi | Installer file |
| MacOS | .dmg | MacOS DiskImage (Intel only, M1 not supported) |
| Linux | .AppImage | Portable executable for all Linux platforms (recommended) |
| Linux | .snap | Ubuntu SnapCraft package |
Full VIAME Desktop Installation
This is the installation guide for DIVE. If you want the full VIAME toolkit, you can get it from github.com/viame/viame. The full toolkit installation includes DIVE.
Supported Dataset Types
DIVE Desktop supports single- and multi-camera datasets.
- Single Camera Dataset is the most common option. Single camera datasets are supported by the majority of VIAME pipeline and training configurations.
- Stereo Datasets are for datasets collected from a camera rig with a left and right camera. These datasets can be used with certain specialty VIAME pipelines. Their physical relationship may be described by a camera transform
.npzfile (numpy transformation matrix). - Multi-Cam Datasets are for more generic multi-camera rig setups. They may have overlapping fields of view.
Shared viewer behavior (camera selection, linked tracks, MultiCamera Tools, and pipelines) is documented in Multicamera and Stereo Data. The web version supports the same import types with a few desktop-only advanced options.
Interactive annotation (Desktop only)
DIVE Desktop can run VIAME-backed interactive segmentation and interactive stereo tools while you annotate. These require a local VIAME install with interactive service support and are not available in the web annotator.
- Interactive segmentation — click foreground/background points to generate polygon masks (S or the Segment button). See Interactive Annotation.
- Interactive stereo — on stereo datasets, auto-warp annotations between cameras and recompute head/tail length measurements. Configure from the Stereo Settings section in the track list creation settings menu.
Both features share one lazy-loaded Python interactive service subprocess. GPU is recommended for model initialization.
Importing Datasets
Click either Open Image Sequence or Open Video to begin a single camera default import. Click the dropdown button to show additional import options.
- From File is the default option for videos. It will open a file picker and allow you to choose a single video file.
- Directory is the default option for image sequences. It will prompt you to choose an entire folder of images to import as a dataset.
- You can use globbing patterns to filter the contents of an image directory during import. Click Show advanced options to reveal the glob input.
- Image List will prompt you to choose a
.txtfile that contains an image name or full path on each line. - Stereo will prompt you to choose 2 videos or 2 image sequences and a calibration file.
- Multi-Cam will prompt you to describe the multi-cam configuration by naming several cameras and picking the source media for each.
- MultiCam Batch will prompt you to choose a root folder of collect subfolders and import one multicam image-sequence dataset per collect. See Batch multicam import for the expected folder layout.
The import routine will look for .csv and .json files in the same directory as the source media, and you will be prompted to manually select an annotation file and a Configuration File (DIVE JSON). Neither is required.
Advanced options also include an optional Metadata File (.json, .txt, or .csv) — a pipeline sidecar such as a flight log. This is not the same as the Configuration File: DIVE does not parse it, and only pipelines that declare # Metadata File: receive it at run time. Metadata can be attached on single-camera, stereo, and multicam imports. See Pipe file headers.
Launching from the command line
DIVE Desktop can open a dataset directly from the command line, skipping the import wizard. This is useful for reviewing detector output, scripting open-and-review workflows, or jumping straight into annotation.
Pass the flags to the DIVE Desktop executable (for example DIVE-Desktop.exe on Windows, or ./DIVE-Desktop-<version>.AppImage on Linux). Relative paths are resolved against the current working directory.
Single-camera datasets
1 | |
| Flag | Short | Description |
|---|---|---|
--import |
-i |
Media to open: an image-sequence directory, an image-list .txt file (one image path per line), or a video. Same inputs as the import wizard. |
--annotations |
-a |
Optional annotation file to load (VIAME CSV or DIVE JSON). |
--metadata |
Optional pipeline metadata sidecar (.json, .txt, or .csv), e.g. a flight log. Same as the import wizard's Metadata File picker; only used by pipelines that declare # Metadata File:. |
|
--name |
-n |
Optional display name; defaults to the media basename. |
Example — review a detector CSV over an image list:
1 | |
Multi-camera and stereo datasets
Name each camera with a repeated --camera instead of --import:
1 2 3 4 | |
| Flag | Short | Description |
|---|---|---|
--camera |
-c |
<name>=<media>, repeated once per camera (at least two). Media paths accept the same kinds as --import. Only the first = separates name from path, so Windows paths like left=C:\data\left work. Flag order is the display order. |
--annotations |
-a |
In multi-camera mode, <camera>=<file>. Give once per camera that has annotations; cameras without annotations may be omitted. |
--calibration |
Optional stereo calibration (.npz or .json). Multi-camera only. |
|
--metadata |
Optional pipeline metadata sidecar (.json, .txt, or .csv). Available for single-camera and multi-camera imports alike. |
|
--default-display |
Camera shown on open. Defaults to left when that camera exists, otherwise the first --camera. |
|
--name |
-n |
Optional display name. |
Note
There is no separate stereo flag. As elsewhere in DIVE, cameras named exactly left and right create a stereo dataset; any other set of names creates a multicam dataset. Pass --calibration when you need stereo measurement. See Multicamera and Stereo Data.
Every camera must use the same kind of media (all videos or all image sequences). --import and --camera are mutually exclusive.
Behavior notes
- The result is a normal Desktop dataset: it appears in the library / recents list and can be reopened later, the same as if imported through the UI.
- Media that requires transcoding is converted first; the viewer opens when conversion finishes. When that happens, DIVE shows a notice (and logs to the console) so a cold start or an open while another dataset is already in the viewer is not mistaken for a hang.
- If DIVE Desktop is already running, a second launch with these flags opens the dataset in the existing window instead of starting another instance.
- Glob / keyword multi-camera folder layouts from the UI are not available on the command line; pass one
--cameraper source instead.
This is separate from the server dive command-line tools used for format conversion.
Video Transcoding
DIVE Desktop is an Electron application built on web technologies. Certain video codecs require automatic transcoding to be usable. Video will be transcoded unless all the following conditions are met.
codec=h264sample_aspect_ratio (SAR)=1:1
Transcoding is done with ffmpeg, which comes bundled with the DIVE Desktop executable.
Running Training
- Click on Training to open the training tab.
- Add one or more datasets to the staging area by clicking .
- Choose an appropriate training config file and any training parameters. These are documented on the training configuration page.
- Click Train on (N) Datasets. Note that depending on what configuration and datasets you chose, training could take hours or days.
Desktop Settings
DIVE Desktop requires a local installation of the VIAME toolkit to run ML pipelines and training.
- VIAME Install Path is set automatically if you use the
launch_dive_interface.[bat|sh]script from a VIAME install. Otherwise, you may need to change this yourself.- Use Choose to choose the base installation path, then click Save.
- Project Data Storage Path defaults to a subfolder in your user workspace and should generally not be changed.
- Read only mode disables the ability to save when using the annotator.
- Synchronize Library - The Synchronize Library with Project Data button is useful if data in the Project Data Storage Path gets out of sync with what appears in the Library list.
Data Storage Path
The data storage path is not at all related to "project folders" in VIAME. It's just a place for DIVE Desktop to keep and structure all the data it needs to run.
A typical data storage directory has 3 subfolders:
DIVE_Jobs- Each job run has a working directory, kept here.DIVE_Projects- Each dataset you import into desktop has metadata and annotation data (with revision history) kept here.DIVE_Pipelines- Training runs produce models that get copied into here.
Here's an example of structure you might find in the storage path.
1 2 3 4 5 6 7 8 9 10 11 12 13 14 15 16 17 18 19 20 21 22 23 24 25 26 27 28 29 30 | |
Configuration with env
DIVE Desktop looks for the these environment variables on launch.
| Name | Default | Description |
|---|---|---|
| DIVE_VIAME_INSTALL_PATH | /opt/noaa/viame (Linux/macOS) C:\Program Files\VIAME (Windows) | Overrides the location of the VIAME installation. Users may not change this value in the settings pane if provided. |
| DIVE_READONLY_MODE | None | Overrides read only mode to true or false. Users may still change this value in the settings pane if provided. |
Import/Export of Models
Trained models are kept in ${Project Data Storage Path}/DIVE_Pipelines as described above. Each model file consists of exactly 1 pipe file and some number of other model files.
- The pipe file can be one of
detector.pipe,tracker.pipe, orgenerate.pipe. - Other files can be
.zip,.svm,.lbl, or.cfg.
You can use externally trained models in DIVE by creating a folder containing these files. The name of the configuration or pipeline in dive will be the folder name you create.
Troubleshooting
I imported some data, but I don't see my annotations
See Importing images and video above. You most likely need to specify your annotation file in the import dialog.
Some VIAME canned pipelines are missing, or there are no training configuration files.
You may need to install VIAME Toolkit, or correct your VIAME Install Base Path setting.
If you don't see some pipelines you expect, you may not have installed the addons (also called Optional Patches) yet. Download and install these based on the VIAME installation docs.
Advanced troubleshooting
If you experience problems or have questions about DIVE Desktop, contact us and include the content from the settings page such as Build Version as well as your currently installed VIAME version.
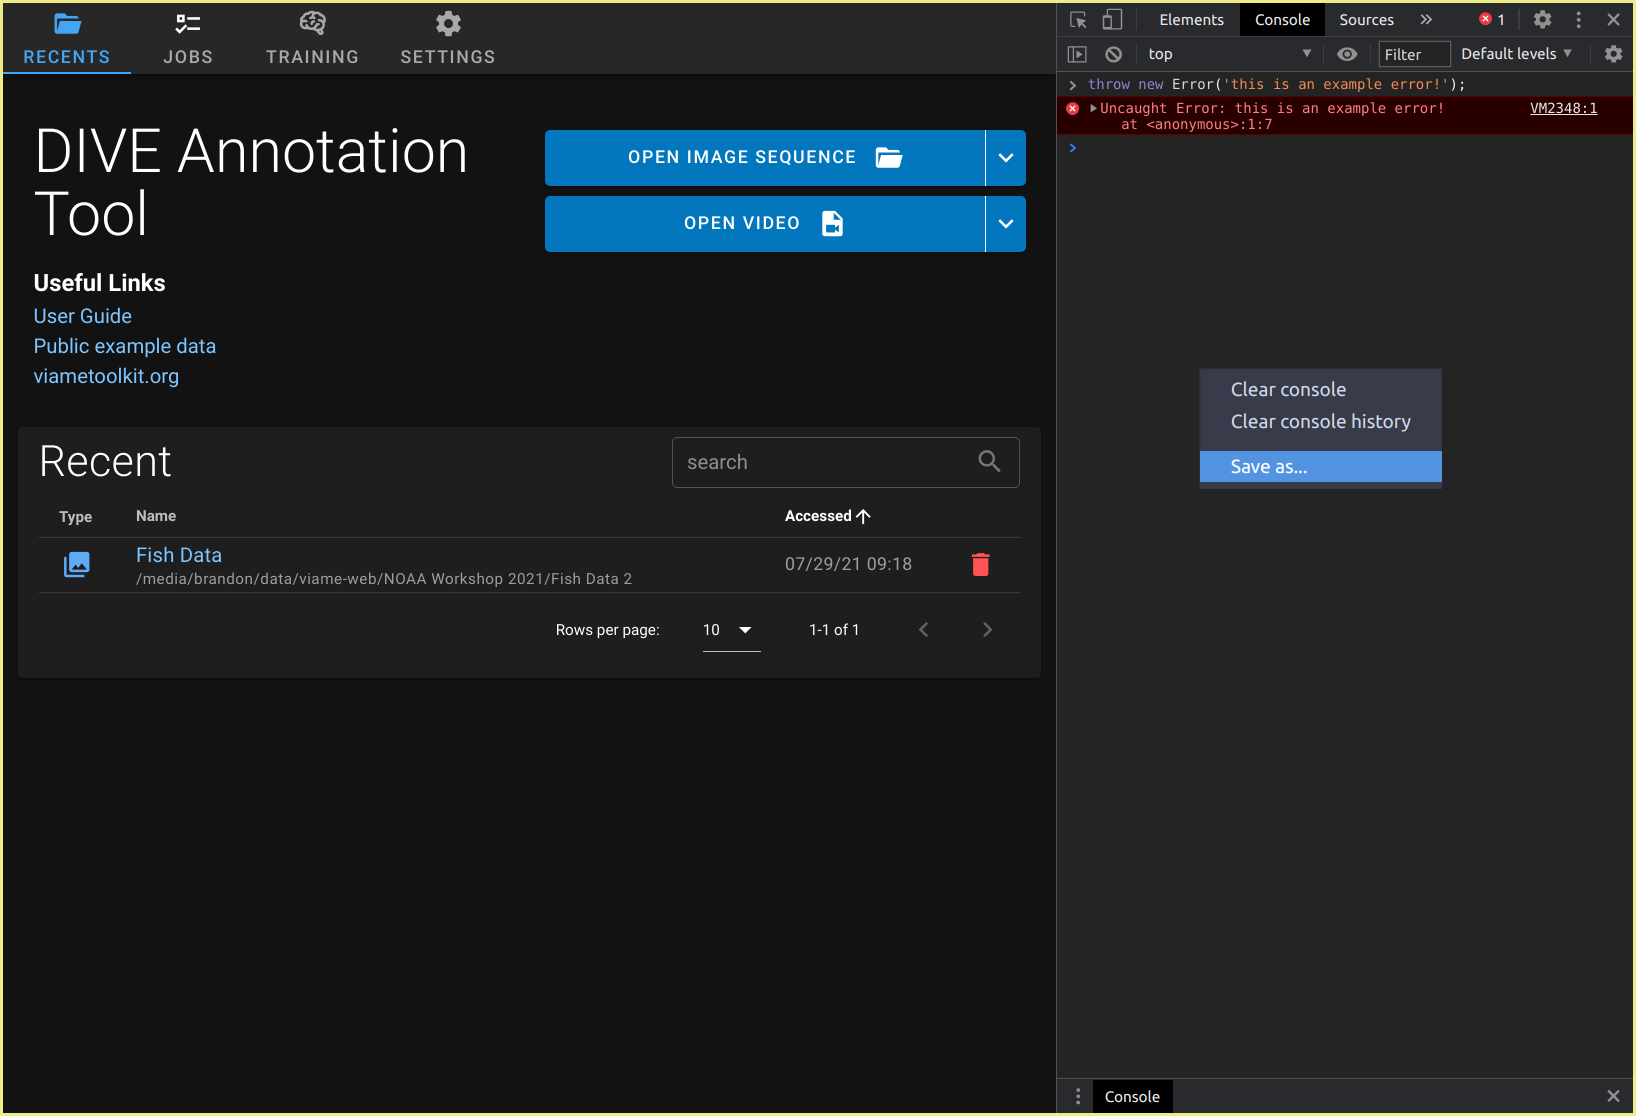
It's also helpful to look in the debug console. Press Ctrl+Shift+I to launch the Dev Tools and look under the console tab. Errors and warnings will appear in red and yellow. You can right-click in the console area and click "Save As" to save the log file and open a support ticket
Interactive segmentation or stereo fails to load
See Interactive Annotation troubleshooting. Verify the VIAME install path, confirm VIAME includes interactive service support, and check the debug console for subprocess errors (message: "Unable to load the interactive service").