

How to use trame
Trame aims to streamline the creation of visual analytics applications, with support for interactive data manipulation and visualization, through a very compact and simple API. This document describes the core API and concepts behind trame; the document is both a start up guide, but also a quick reference for those more familiar with trame.
Core concepts
Let's say you are building a data intensive application. You have a Python codebase organizing your workflows and processing, and now you'd like to add a user interface. trame provides your app with straightforward state management and engaging user interfaces through Shared State and Reactive UI Components.
trame integrates your application's browser interface with its server backend through a Shared State of key-value pairs. These keys will hold any inputs from the user that you'd like to set as parameters for your processing. They may then hold the results of your computation so that they can be displayed to the user. And they enable modules like trame's vtk component to add interactive 3D visuals to your interface.
When your interface or your server updates one of the keys in the Shared State, the state is efficiently synchronized on both the server and the client. In cases where changes are difficult to notice, such as changing a value deep in a nested dictionary, trame provides methods to mark the data dirty and force a synchronization.
When the Shared State is updated, your interface updates too, thanks to the reactivity of the provided UI components. Under the hood, trame uses Vue and its reactivity to reflect updates in values of the Shared State. This reactivity goes the other way too: trame provides decorators for Python functions so they can be called whenever a value is updated, or when triggered by a button.
The rest of this document walks through both directions in more detail, starting with the Shared State.
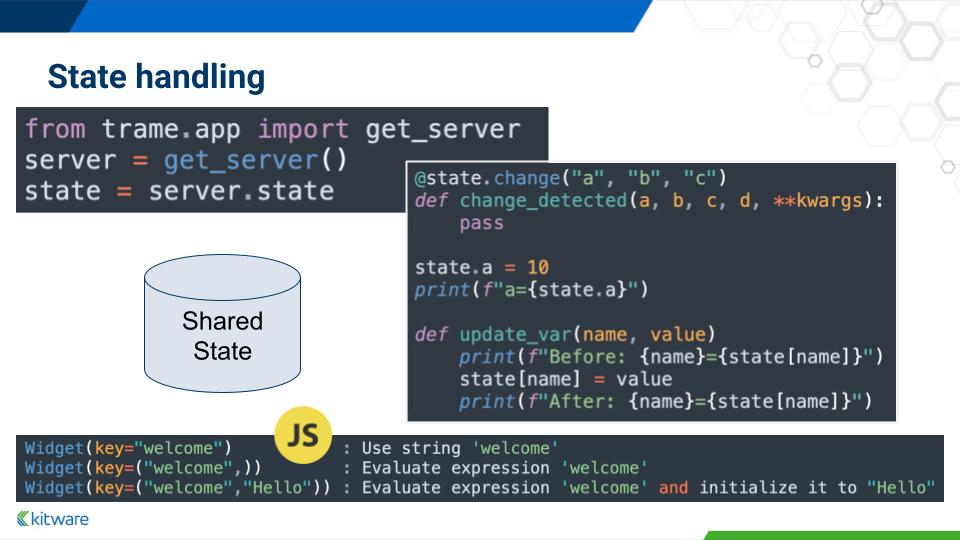
Shared state
Trame mainly focuses on the Python side, therefore the variables that we aim to use across our application will be defined from Python. The following sections illustrate the various ways the shared state can be modified.
UI element with a dynamic variable
The example below uses Vuetify to create a slider where the value is controlled by the slider. The variable slider_value is initialized with the value 8. So variables in the shared state can be defined and initialized right were we want to use them when defining our UI elements. In this example, the slider will be able to modify that value but also will reflect its content if that value changes on the server side.
from trame.widgets import vuetify

slider = vuetify.VSlider(
  label="Example",
  min=2,
  max=15,
  v_model=("slider_value", 8),
)
Listening to changes
Imagine that we want to monitor the value of slider_value within our Python application and execute a method when that variable is updated. The code below illustrates how we can annotate a function so it can be called when a value of the shared state is modified.
from trame.app import get_server

server = get_server()
state = server.state

@state.change("slider_value")
def slider_value_change(slider_value, **kwargs):
  print(f"Slider is changing slider_value to {slider_value}")
So far, we only have the client modifying that variable. But if a function on the server were to change that variable, the function would also be called as we simply react to the fact that the variable has been updated by someone.
Changing the value from Python
Within a Python trame application, it is possible to update the UI in response to read and even write operations to and from the shared state. The code below provides a function that will read the current value and update its content.
from trame.app import get_server

server = get_server()
state = server.state

def random_update():
  state.slider_value += 1
  if state.slider_value > 15:
    state.slider_value = 2
Forcing state exchange
Sometimes, the variable inside your shared state is an actual object with a nested structure. While the state on the Python side always maintains a reference to that object, when manually editing it's important to flush its contents so that the client reflects changes. In this situation, the dirty() method can be called with the list of variable names that should be pushed.
Here is a simple example of what we mean by nested structure.
from trame.app import get_server

server = get_server()
state = server.state

state.list_variable = []
state.dict_variable = {}

def edit_state():
  state.list_variable.append(f"new item {len(state.list_variable)}")
  state.dict_variable["a"] = state.dict_variable.setdefault("a", 1) + 1
  state.dirty("list_variable", "dict_variable")
You can also decide when a state needs to be flushed using it as a context manager. Be aware that flushing will only work on variables that are known to be modified/dirty. Also such flushing operation is mandatory when running in an async task or coroutine. The code below provides a simple example.
import asyncio
import time

async def update_time():
  while True:
    await asyncio.sleep(1)
    # needed because of async and will flush on exit
    with state:
      # modification is automatically detected
      state.time = time.time()

      # dirty() is needed as we modify object in place
      # => python does not know that "list_variable" has changed
      state.list_variable.append(len(state.list_variable))
      state.dirty("list_variable")
Method calls
When building a client/server application you will need to be able to trigger methods on both sides and trame has some easy ways to do that.
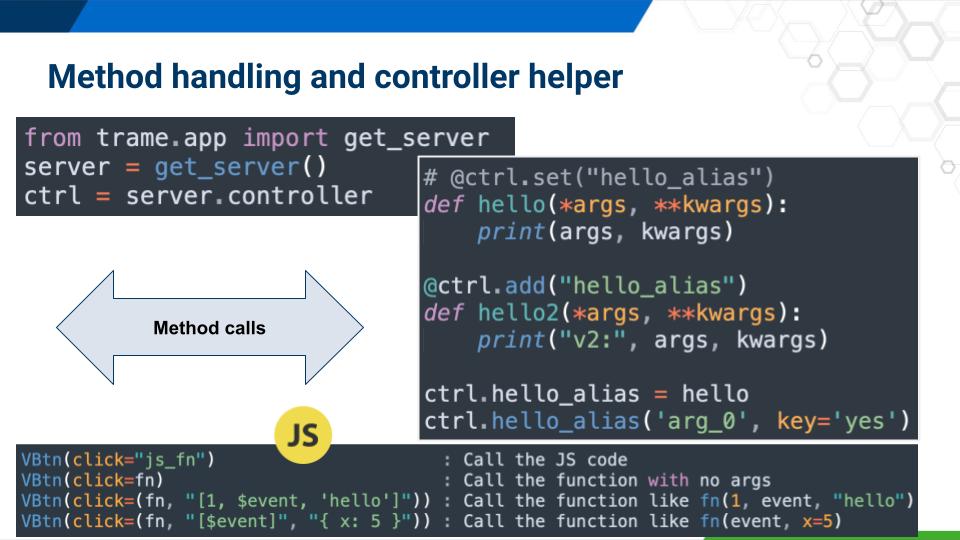
Bind method to a button click
The example below re-uses the function we had defined before but now we bind it to a button.
from trame.app import get_server
from trame.widgets import vuetify

server = get_server()
state, ctrl = server.state, server.controller

change_btn = vuetify.VBtn(
  "Change slider_value",
  click=ctrl.rnd_update
)

def random_update():
  state.slider_value += 1
  if state.slider_value > 15:
    state.slider_value = 2

# Do the binding later on
ctrl.rnd_update = random_update
Calling JavaScript methods
Some components in an application may have APIs that you be used and invoked from the Python side. The code below provides an example of such a use case:
from trame.app import get_server
from trame.widgets import vtk

server = get_server()

html_view = vtk.VtkView(
  ref="vtkView", # Name to identify the Web component on which we want to call a method
  ...
)

def reset_camera():
  server.js_call(ref="vtkView", method="resetCamera", args=[])
Layout management
Layouts are meant to define the core UI elements of an application. Think of FullScreen vs Toolbar, Drawer, Footer and so on. Layouts let you drop pieces of your UI into pre-defined locations. The layout organizes the way an application is structured. It could be defined once, or be redefined at runtime.
When creating a layout, you have the opportunity to define the Tab title along with a path to a favicon and a method to call at startup.
from trame.ui.vuetify3 import SinglePageLayout

with SinglePageLayout(server) as layout:
  layout.title.set_text("My Application")

  with layout.content:
    # Add your UI components here
    ...
SinglePageLayout is one of several layouts trame provides (VAppLayout, SinglePageWithDrawerLayout, trame.ui.html.DivLayout, ...). See the Layouts chapter of the tutorial for a full walkthrough of each.
HTML elements
HTML elements in trame (trame.widgets.html.*) are just helpers for generating HTML content. But because they exist as Python objects, users can interact with them simply by setting attributes on them in plain Python.
Below are various ways that you can translate what you see on a Vue component into trame syntax.
# Attribute without value (boolean)
# <v-btn outlined />
vuetify.VBtn(outlined=True)

# Bind method to event
# <v-btn @click="do_something">
def do_something():
  pass
vuetify.VBtn(click=do_something)

# Dash handling (v-model => v_model)
# <v-slider v-model="slider_value" min="0" max="100" />
vuetify.VSlider(
  v_model=("slider_value", 50), # See state section above
  min=0,
  max=50,
)
Command line arguments
Since trame is used to create applications, as compared to web services that aim to serve many concurrent users, it may be important to provide information to an application on start up. For example, which ML model to load, or the file/directory that you would like to explore or process. This can be achieved by adding CLI parameters using ArgParse, like in the following example.
from trame.app import get_server

server = get_server()

server.cli.add_argument("-d", "--data", help="Directory to explore", dest="data")
args = server.cli.parse_known_args()[0]
print(args.data)
Note that if you intend to use your own CLI parser or rely on a library which parses CLI arguments, you need to make sure that the arguments are not overlapping with the trame server ones. In case of CLI arguments overlapping and still requiring to pass arguments to trame server's, it is recommended to use either the --trame-args flag (eg. --trame-args="-p 1000") or the TRAME_ARGS environment variable, which have a higher priority over CLI arguments.
Starting an application
The server provides a start() method which actually starts a trame application. Typically the following section is placed in the main script:
if __name__ == "__main__":
    server.start()
The full API is listed below
def start(
      port=None,
      thread=False,
      open_browser=True,
      show_connection_info=True,
      disableLogging=False,
      backend="aiohttp",
      exec_mode="main",
      timeout=None,
    ):
    """
    Start web server for serving your application

    Parameters
    ----------
    port    : None or Number
        Port on which the server should run on. When providing 0, the operating system will pick an available one.
    thread  : Boolean
        If true we won't listen to ctrl-c
    open_browser: Boolean
        Default True which will open your browser and connect to your local server. Using --server is similar than passing False.
    show_connection_info: Boolean
        Default True which will print server IP and port information.
    disableLogging: Boolean
        Default False which will keep the default logging setup otherwise logger will be disabled.
    exec_mode: String
      Default "main", Options ["main", "task", "coroutine", "desktop"]
      "main" will block, while "desktop" will run like main but as a standalone application
    timeout=None,
      Adjust timeout. 0 will prevent process ripper from running when no client is connected.